
This post is a long overdue one, as our basement bathroom renovation started about a month after the kitchen! Which is the amount of time it took me to convince my husband that it was silly to renovate the entire kitchen and not the horrendous bath. And when I say horrendous, I mean horrendous.
So let me get you all up to speed because this project is about two weeks out from being finished, and I can’t wait to share the reveal with you!! But let’s start where all good things start: with a little inspiration..
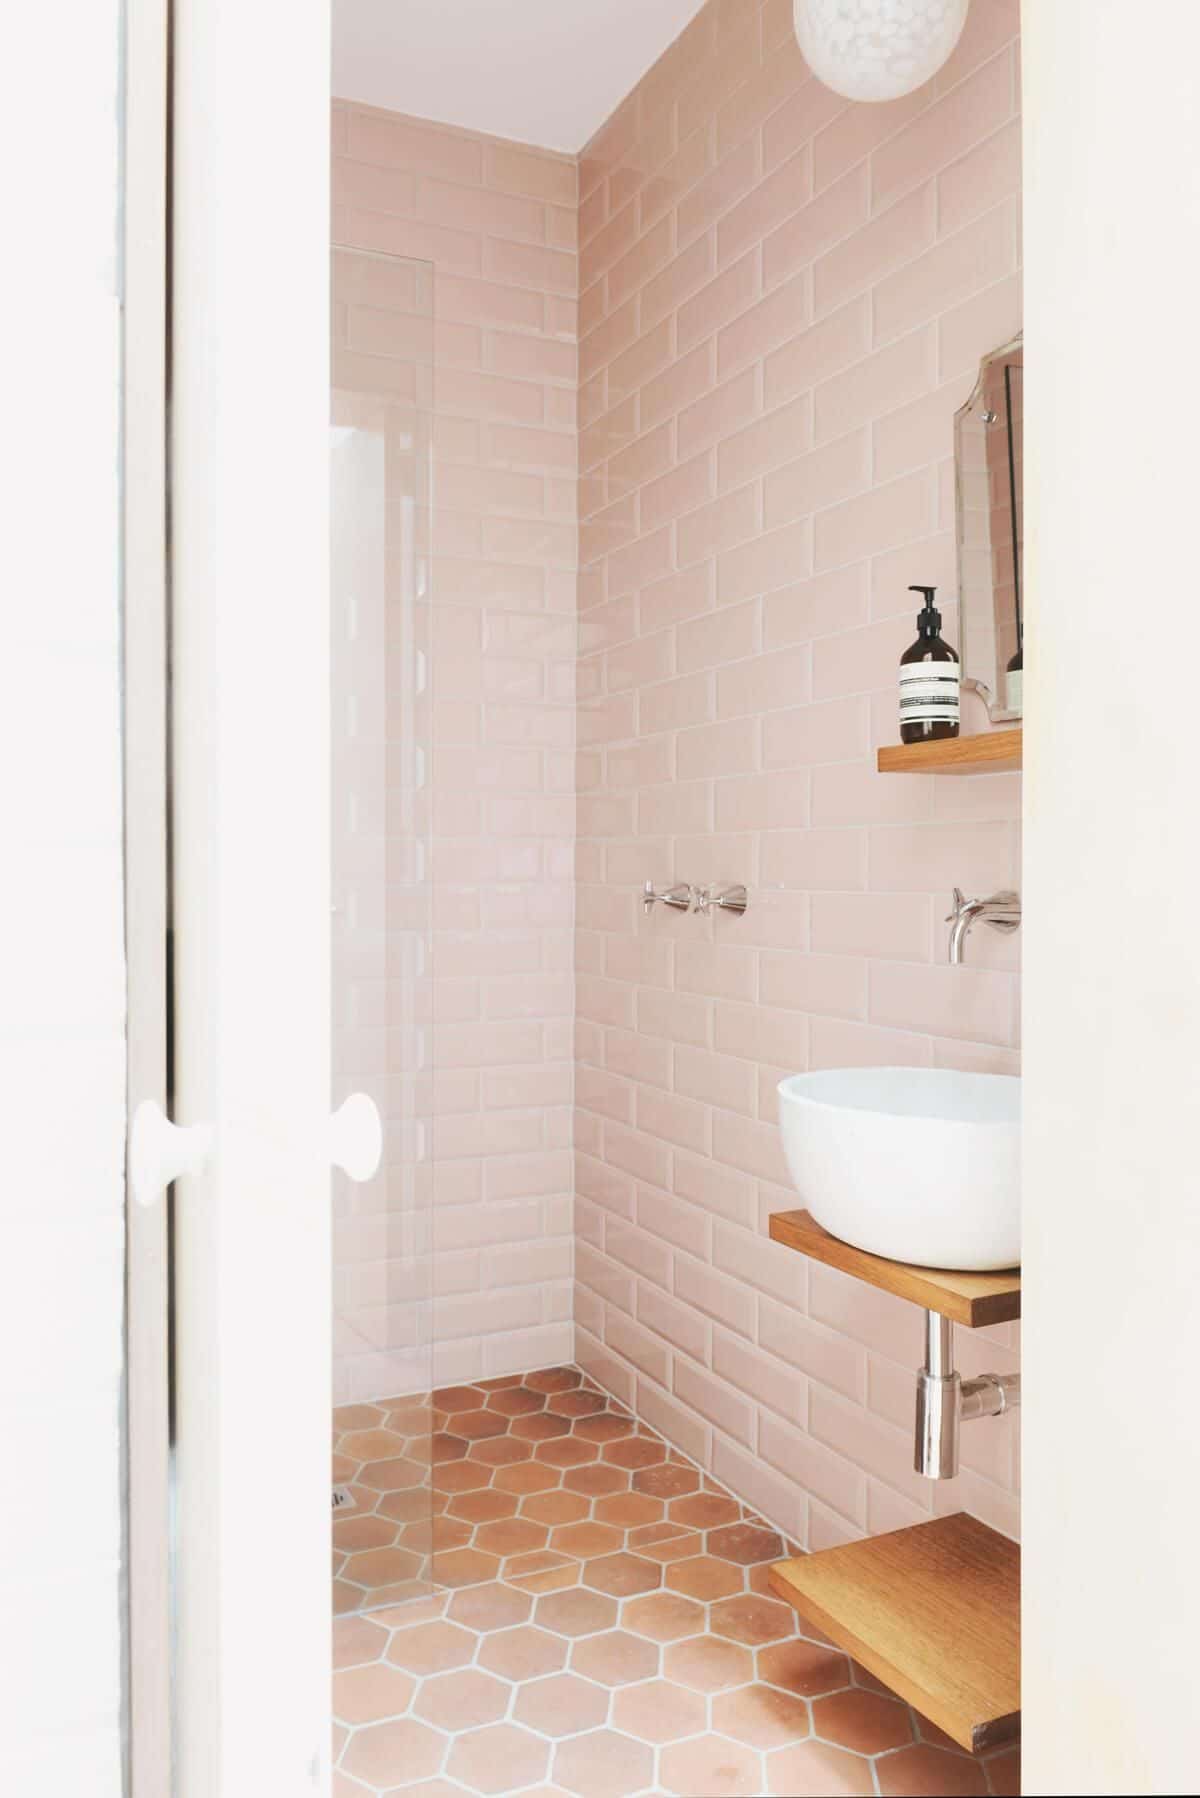
source : emily seeds interiors
When we (ahem, my husband) finally decided that we were going to go for it with the basement bathroom, I knew we had just signed up for a lot of creative thinking. For a small space, it has a lot going on in the way of layout and things jutting into the room. I’ll get to that in a minute when I share the before photos (prepare yourself!). But the first decision we had to make was aesthetic: to keep or not to keep the tile floors.
As in the the rest of the basement, the floors in the bathroom are Saltillo tile. But because this was a smaller space where we really could go for it with something different, my vote was to tear them out. It wasn’t a ton of square footage to have to tile, and the cost was reasonable. However. When you’re doing a remodel, every little bit starts to add up quickly, and this space wasn’t originally in the budget at all. So, once again, the hubs and I went to the negotiating table, and this time… I lost. The tile was going to stay. With the additional (and essential) expenses of new plumbing and wiring in the space, plus duct work, the floor was an extra expense that we couldn’t justify… for now.
So, once I knew that I was going to have to work with what was already in existence, I started doing research.
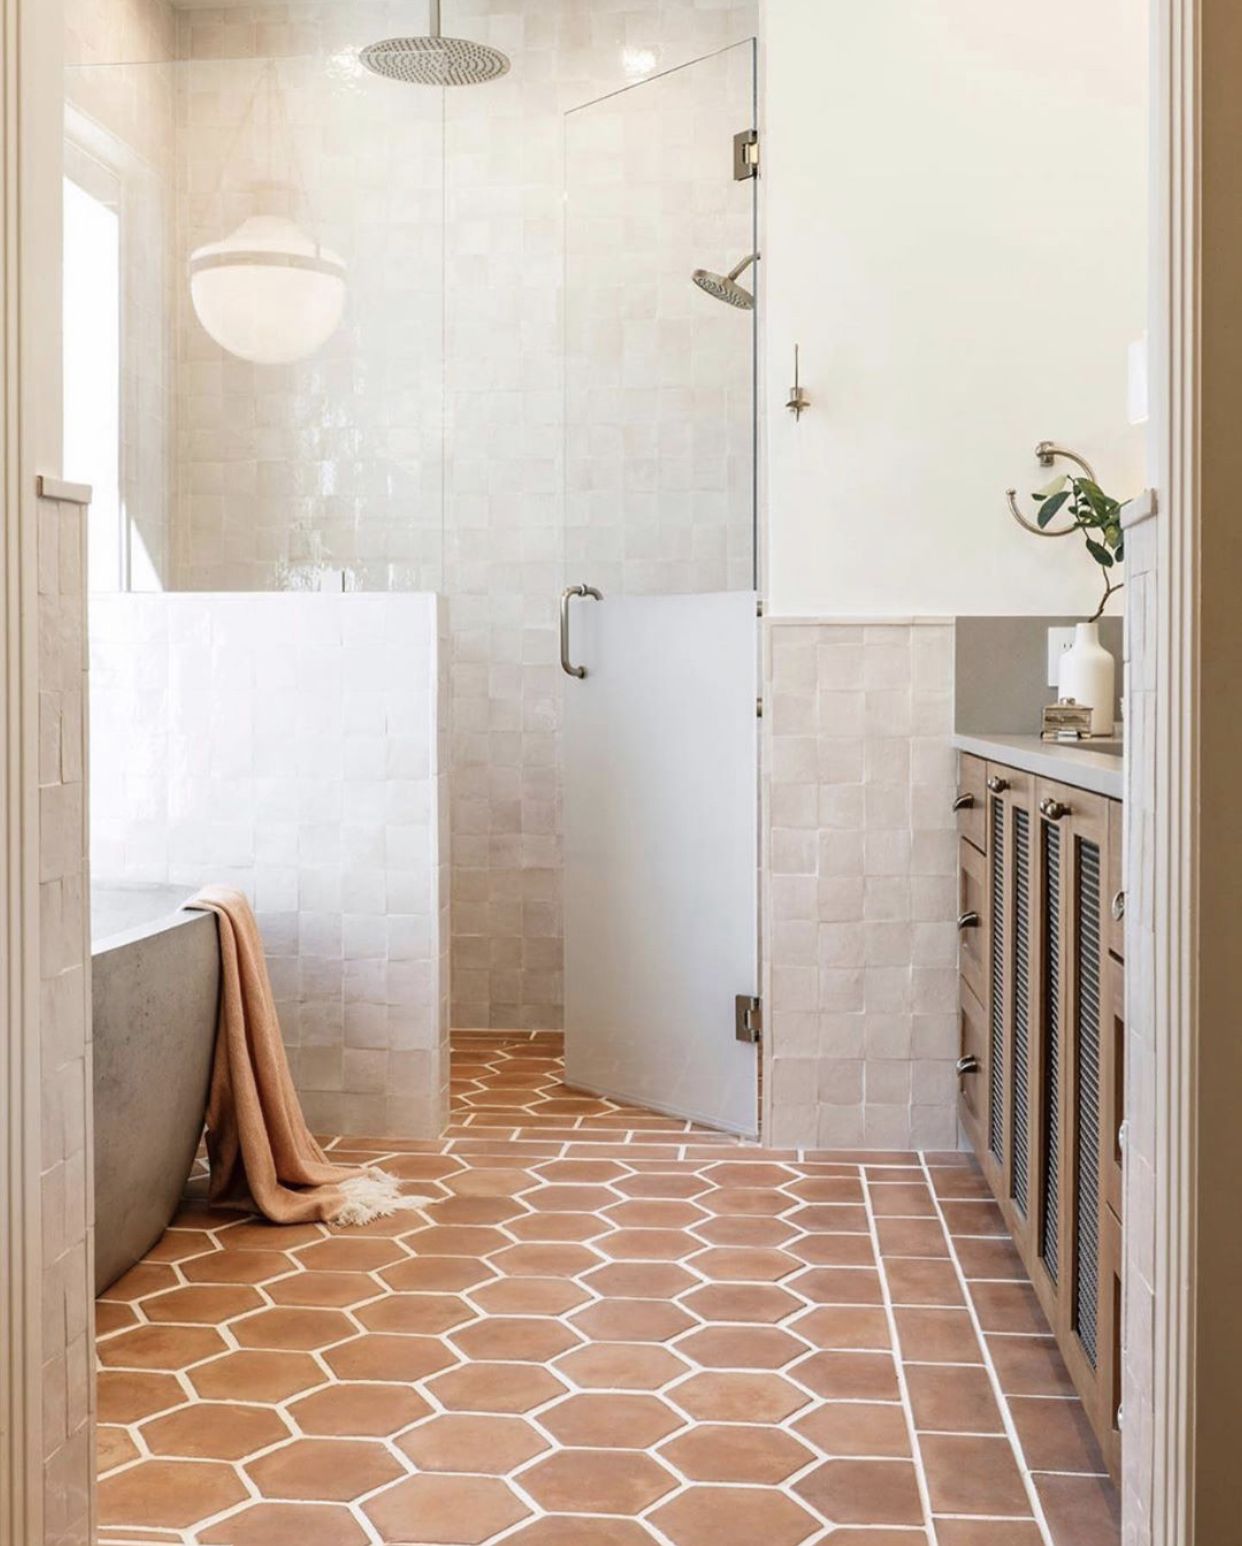
source : hearth studio
Whenever I’m a bit stuck on where to start with a design project, or can’t imagine how things are going to look in my head, I turn to two places: Pinterest, and Photoshop. The two images above started to help me imagine some possibilities for the combination of materials. I find it helpful when doing bathroom designs to simply start with the basic elements of the space: Flooring, tile, fixtures, vanity. material.
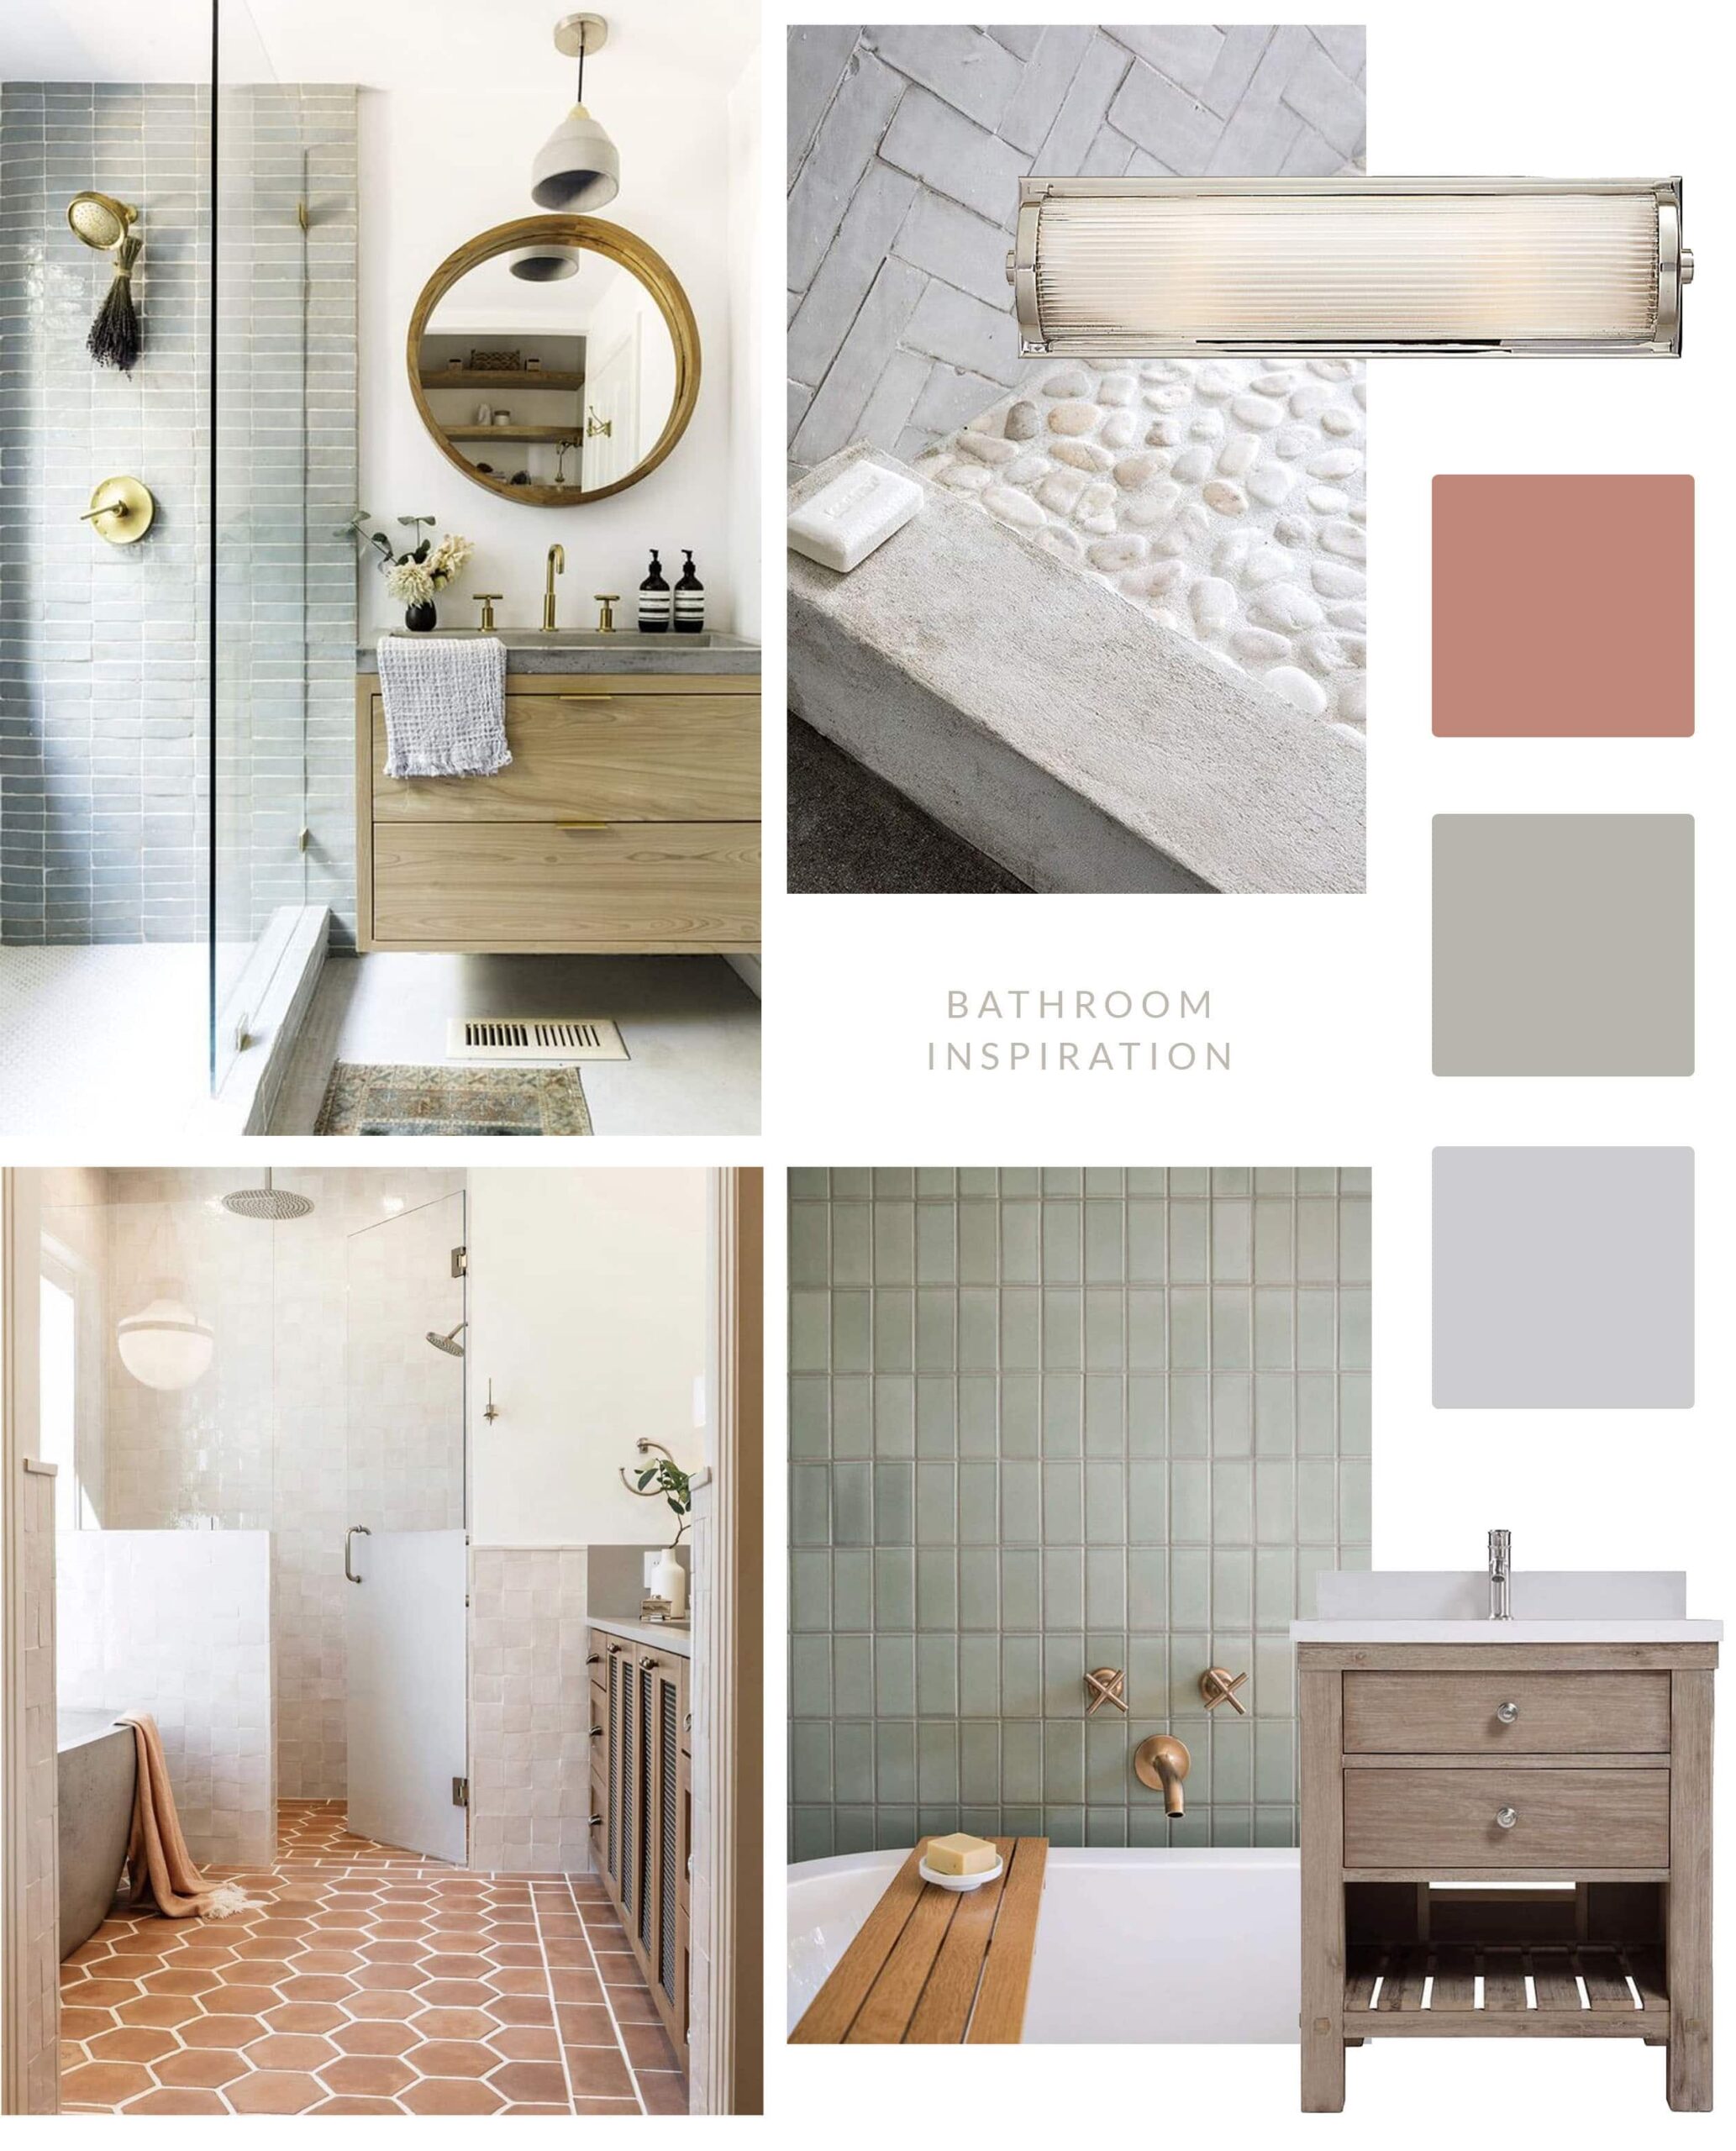
Throughout this design process for the basement I had also been wanting to incorporate more green to balance the strong terra cotta color of the floors, so I started playing with that as well. I ordered tons of tile samples, and considered just about every texture and shape you can imagine. Then I put together a board to feel out where it was all going.
Now that I had a basic direction, it was time to focus on the rest of the details. Ready for this? Here was the original state of our basement bathroom:
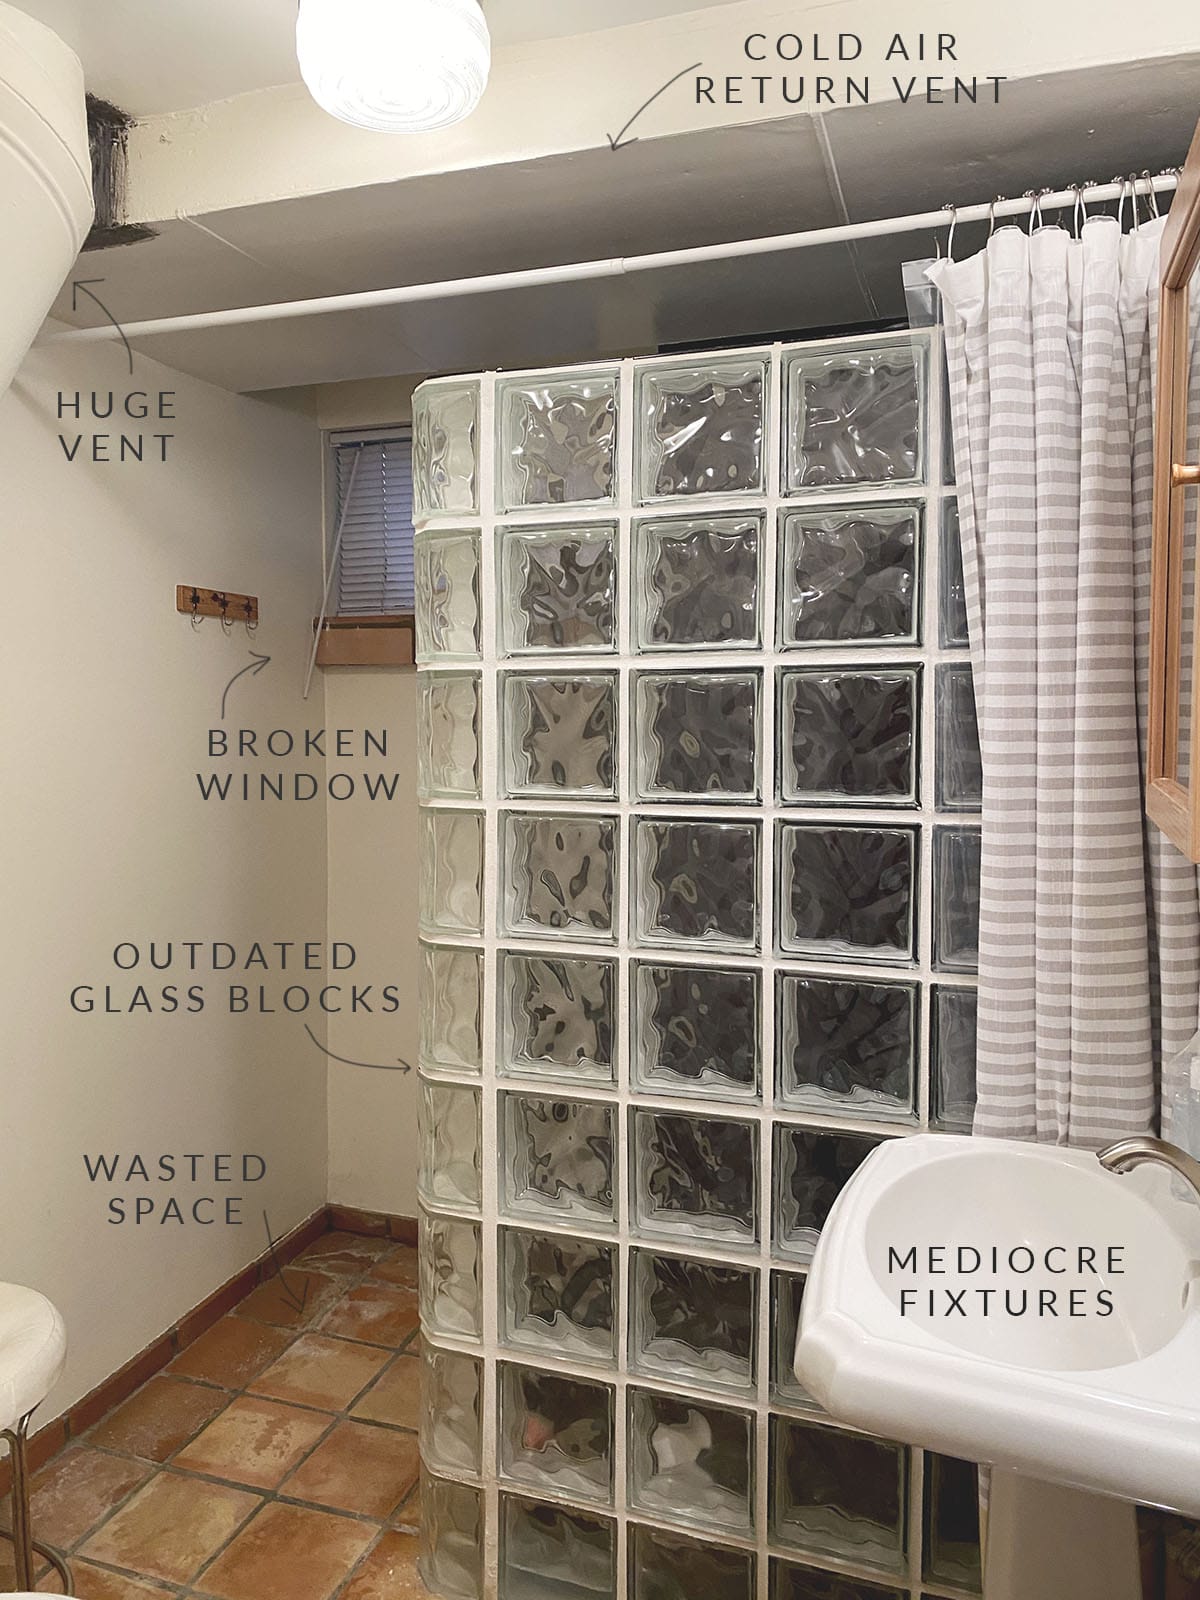
Does anyone else hate these glass blocks with a passion? I’ve seen them creeping back into some ‘modern’ design and I am. Not. A. Fan. These bother me so much that – as you can see – I’ve actually hung a completely non-functional shower curtain that I usually have closed over the shower just so I don’t have to look at them.
But of course, that’s not the only issue here. As I noted before, one of the biggest challenges for this space is the constant change of ceiling height thanks to vents and bad design. The drop above the shower is a cold air return, and to the left you can see a peek of a huge vent sticking into the space. We wanted to remove both of these, to reclaim space but also not feel like we were showering in a submarine.
The rest of the details were items that would be fairly easy to fix. A new sink and vanity with storage, all new lighting, and removing some elements that would help the flow of the space a bit more like the drop in the ceiling from the entrance, and widening some spots too. All these small and large adjustments have already made a huge difference in the space and I can’t wait to show you a complete set of before and afters. It’s amazing how taking a couple inches off a wall can make a difference.
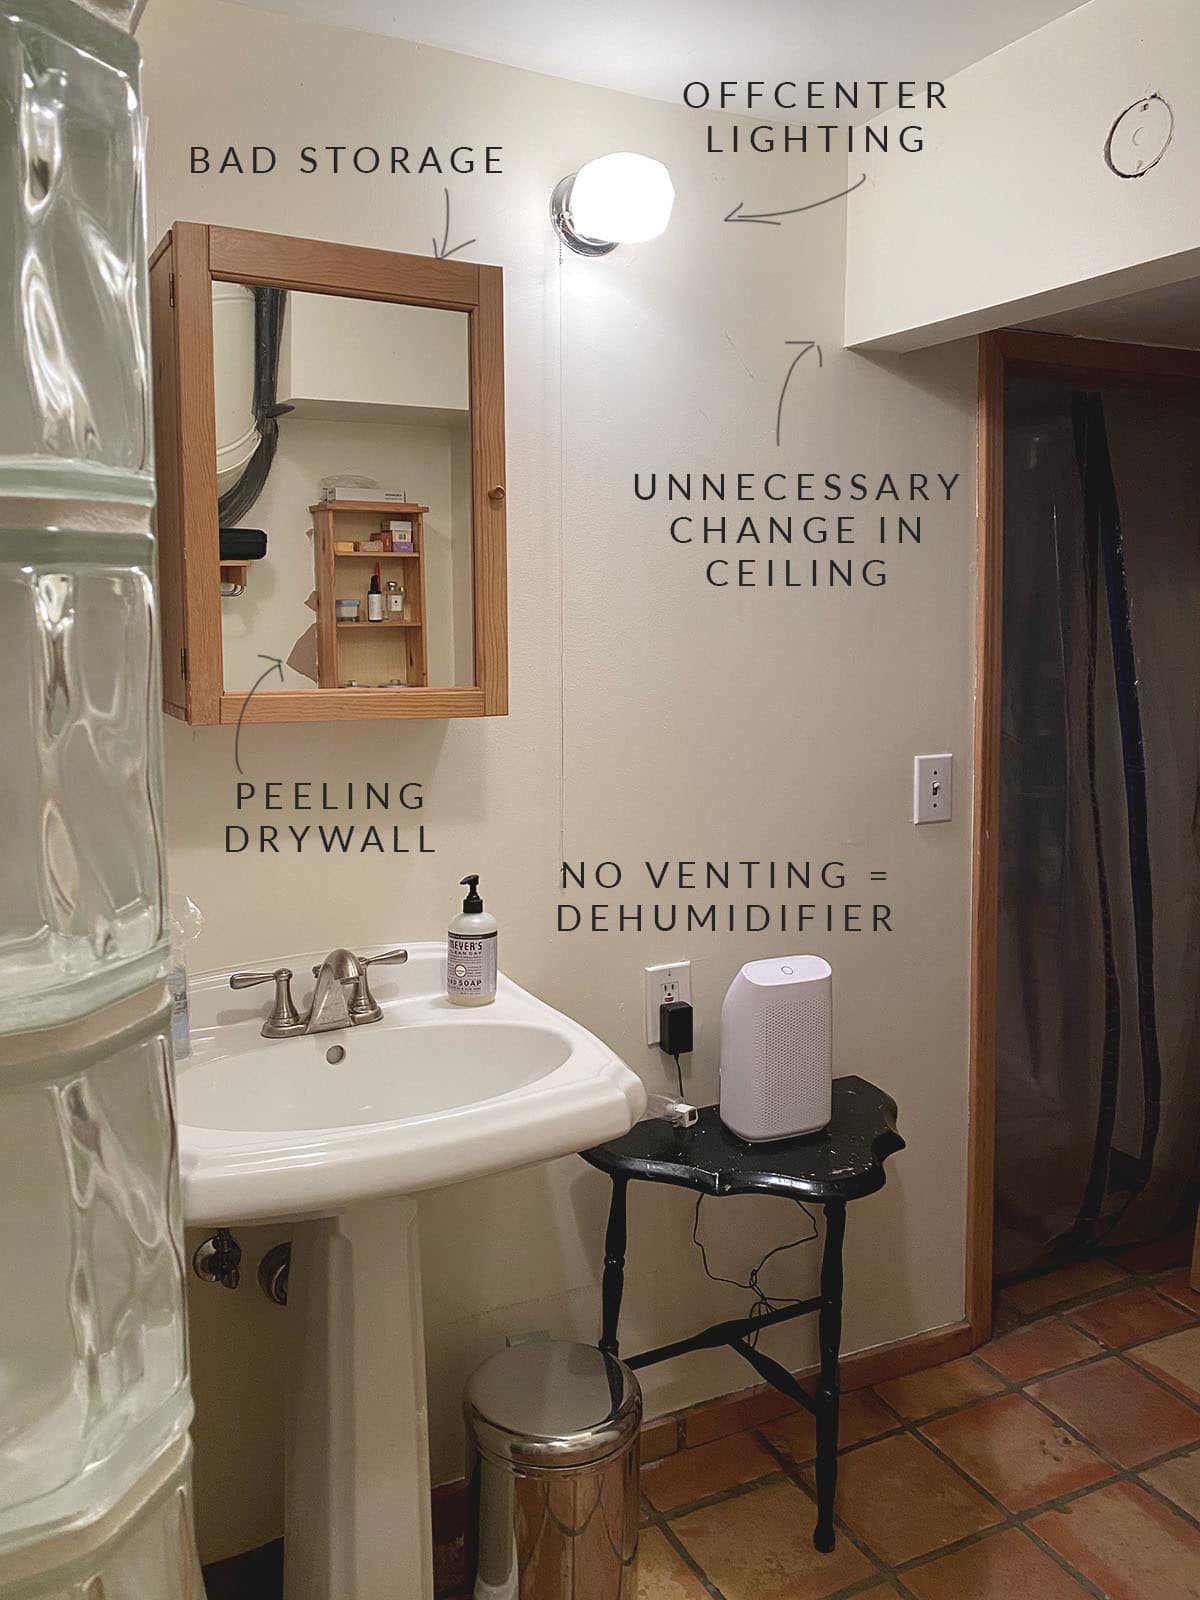
But the biggest reason for us wanting to redo this space (beyond the fact that it hurt my eyeballs) was that I was convinced the shower was leaking into the walls and floors. Sure enough, when we demo’d everything, much of the wood was wet and the floor needed to be totally resealed. We were lucky there wasn’t a vast amount of mold (I don’t know how!) but what really made me want to tear everything out of this perfectly functional bathroom was the fact that the shoddy workmanship that came before us was a health and foundation concern.
Now, I’m not going to lie, when it came to designing the room, my first instinct was to go with the idea of re-grouting the current tile with white, and do an all white shower to keep things simple and bright. And then I was like… really, Cass? An all white shower?? HOW BORING. You can do better than that.
So I did. I started treating myself like a design client, and thought: What if I pushed it in a bit of a different direction? I reminded myself of my original plans which were to channel a bit of a Mediterranean vibe. I looked at patterned tile, but felt it was a bit busy for such a small space. But with the floors being 8×8 squares, I really didn’t want to do more square or rectangle. And that’s when I landed on the final solution: a star and cross motif from Fireclay Tile.
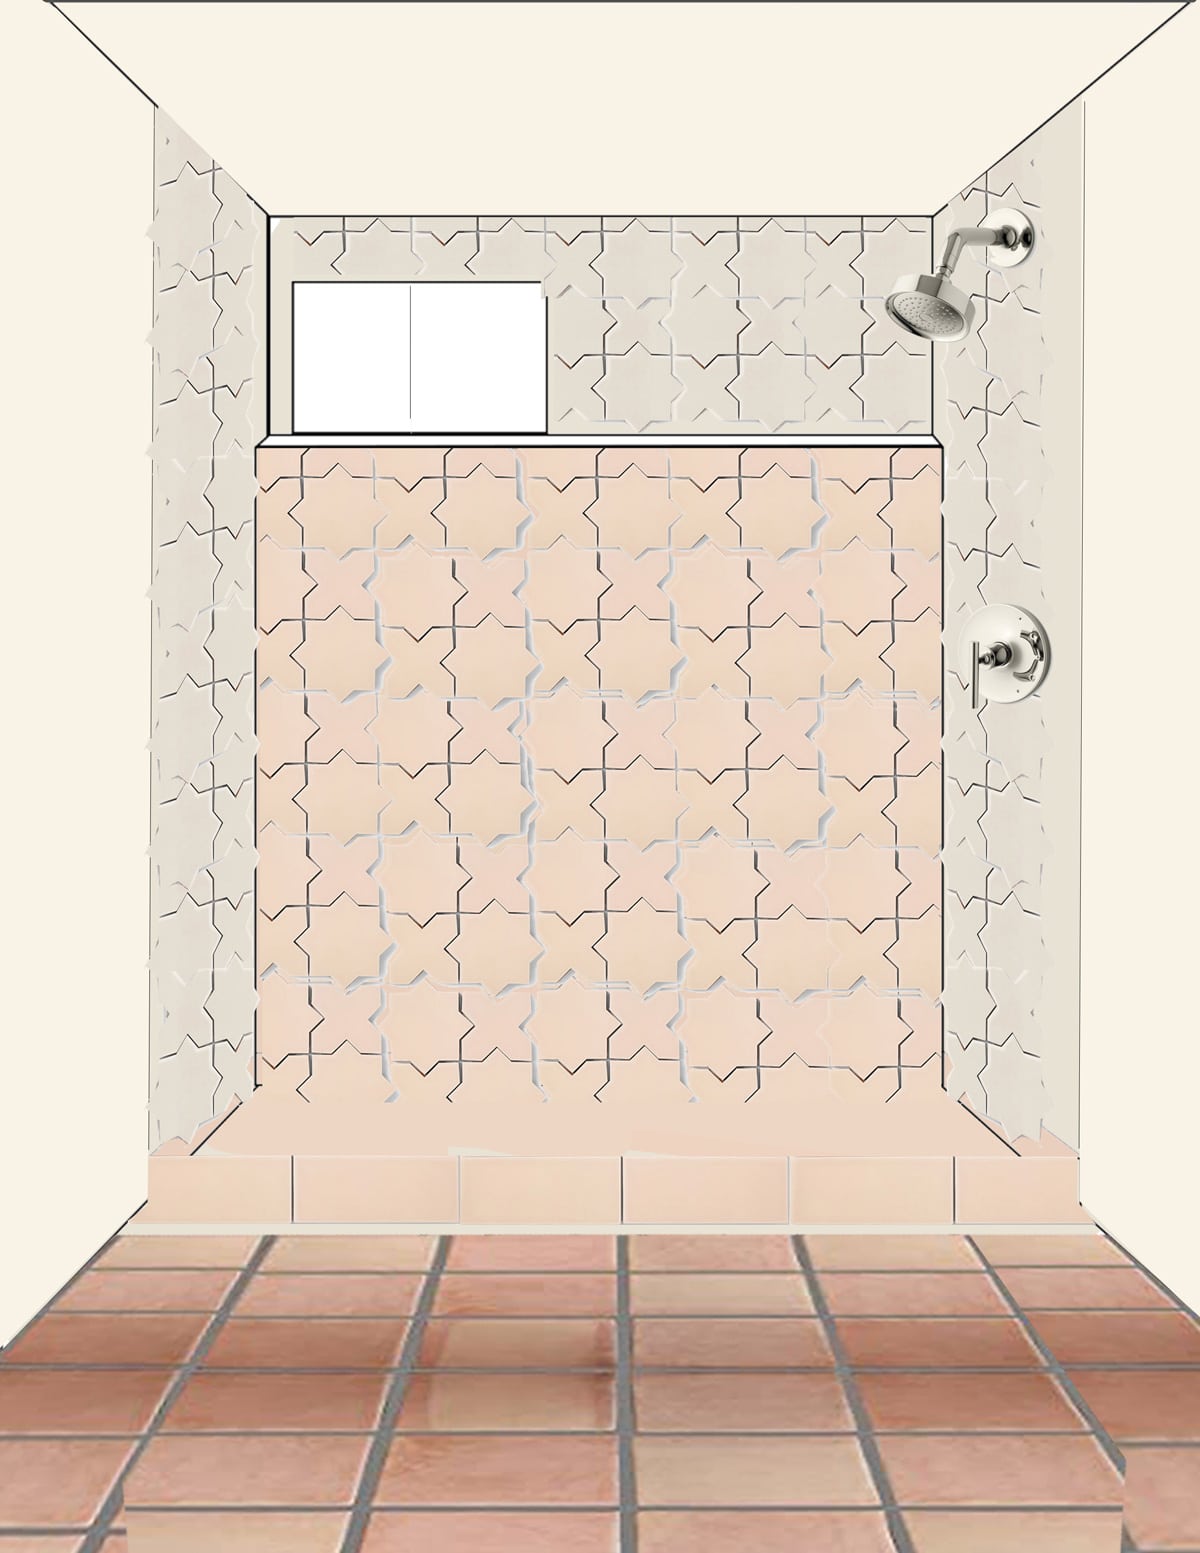
Now, you’ll have to excuse this totally amateur rendering, but this is what I put together in photoshop just to start imagining how the colors and tile might work together. Once I landed on the star and cross motif, I immediately decided that the green was out. With all the funky lines in the space, I wanted to keep things interesting, but clean, so I decided to stick with a tonal palette.
After entertaining a variety of samples, I landed on a pale peachy-pink called Tumbleweed, and the most perfect creamy white in Feldspar. The pink perfectly picks up on this exact tone in the Saltillo, the color I most wanted to focus on. I decided to make a seamless transition from the floor to the wall by using the one color all the way up to the ledge in the shower. I kept the walls white to keep things from feeling like a pink cocoon, and to also extend the walls visually into the shower. This combination felt fresh, unique, and solved the floor ‘problem’ in a way that made me feel excited to have it all come together! Sometimes challenges in a space result in unique decisions, and that definitely happened for me here.
Given a blank slate, I’m not sure I would have chosen the same elements, but working within the constraints of the floor brought me to this perfect conclusion, and I can’t wait to see it come together! Here’s where we’re at!
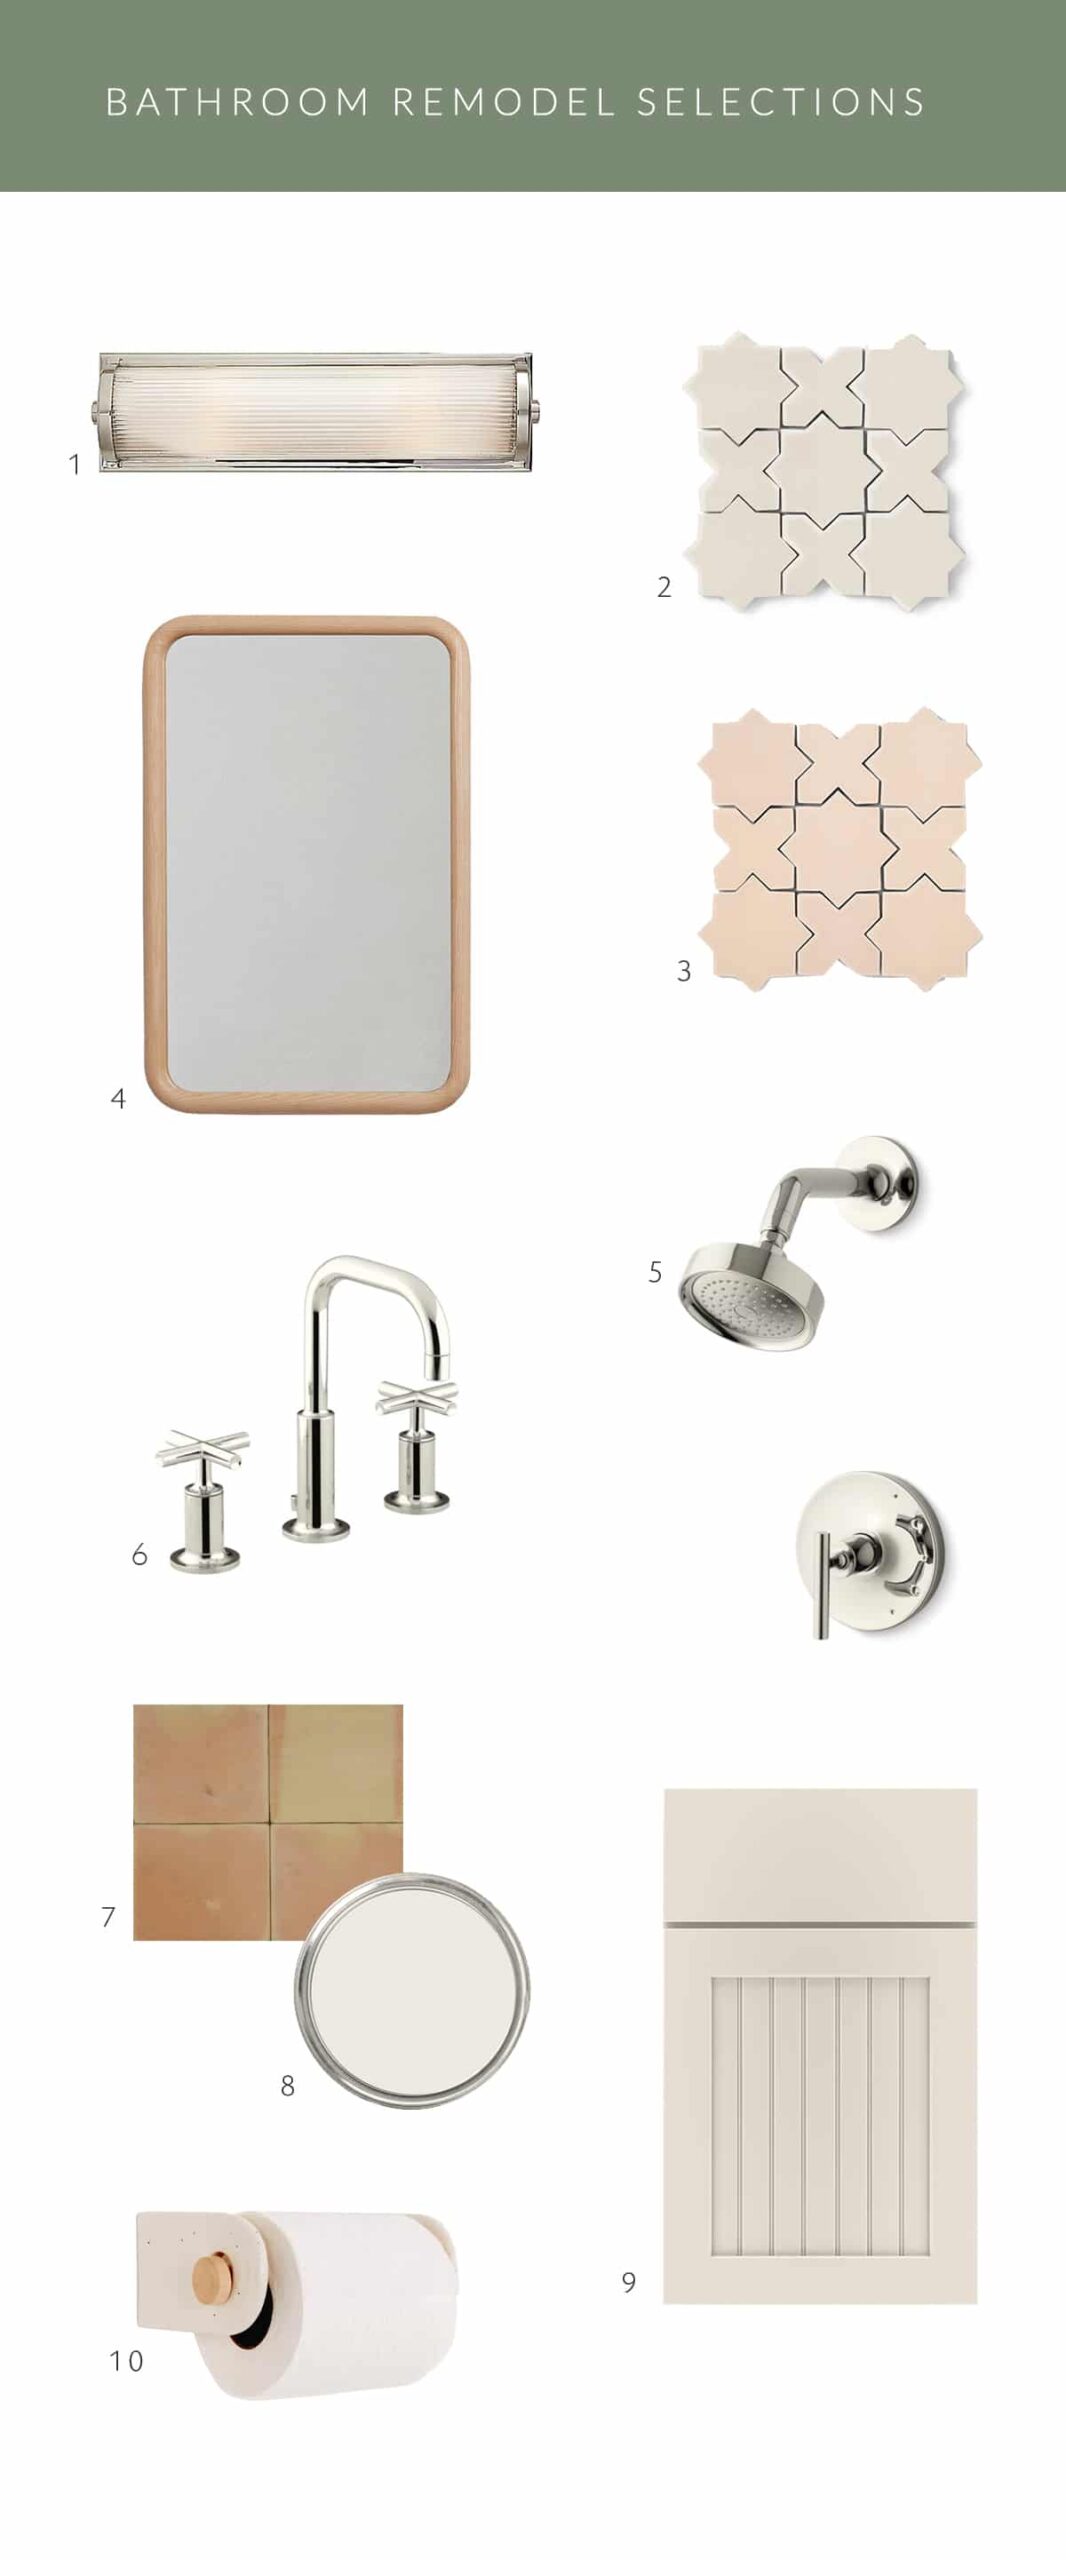
1. ‘Dresser’ Wall Sconce in Polished Nickel | 2. Fireclay tile in Feldspar | 3. Fireclay tile in Tumbleweed | 4. OWL oak mirror | 5. Kohler Purist shower set | 6. Kohler Purist faucet | 7. current Saltillo tile | 8. ‘Marshmallow’ Paint by Sherwin Williams | 9. custom vanity from Masterbrand Cabinets Diamond line | 10. ceramic toilet paper holder
As always, I’m working hard to balance an elevated space with natural elements to keep things warm but refined, and I think this space exhibits that perfectly! Since we are doing polished nickel finishes in the kitchen, I decided to carry that metal into the bathroom as well. It sits nicely with all the warm tones of the tile, and feels fresh! The area in which we wanted a vanity was so limited that I was thrilled when Masterbrand Cabinets agreed to do a custom piece for us, continuing the same style from the kitchen in a lighter finish (Dover) into this space. And, I managed to sneak in my favorite sconce!! I’ve basically known I wanted to use it since blogging about this basement bathroom. It’s so classic, and I love it paired with a simple wood mirror. Which by the way, took me forever to find in the right size.
Once we started making decisions, I have to say that things started moving along quickly! We are actually almost to the finish line with this little space, and I’m so happy about it. I can’t wait to show you a bit more in-depth on all the little practical changes we made to the space and walk you through a bit more about how we make those decisions! It’s a really important part of the remodel process that I feel doesn’t always get the attention it’s due, so stay tuned fore more on that coming soon!